|
Edison, the robot, not the man (https://meetedison.com/ https://twitter.com/MeetEdison ) is a little, $50, self contained robot that has 2 motors/wheels, Left&Right light sensors, a clap sensor, a buzzer, a line follower, L&R infrared LED’s, and L&R LED’s. It is about the size of the palm of an adult hand. 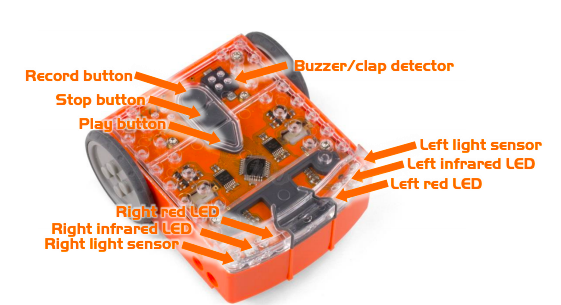 It can communicate with other Edison’s. You can build on it using Lego’s. They have an EdCreate pack of small building parts available for $29 (https://meetedison.com/product/edcreate-edison-robot-creators-kit/ ). I did not get this pack. You can program it with barcodes and remote control, as well as their own browser based versions of blocks, scratch, and python (EdBlocks, EdScratch, EdPy). You can use a computer or tablet to program. You will need to create an account to save & share programs. An interesting quirk is that the program is transferred via sound, so they have a special audio cable. Edison runs on 4 AAA batteries (the audio cable comes tucked inside the battery compartment). They have a nice “getting started” document https://meetedison.com/content/Get-started-with-Edison-guide-English.pdf ) They also have support documents for each of the coding platforms, including teaching guides, student sheets, many example codes, even videos. https://meetedison.com/robot-programming-software/ This is organized by platform. Or you can access their youtube channel for all the videos https://www.youtube.com/user/microbric/playlists After you have created a program in EdBlocks , EdScratch , or EdPy , (is you Edison on and connected? You should see two flashing lights), you click “Program Edison” in the top right of the browser, it creates a .wav file. Press the record button on the Edison once, (Edison lights should go solid), press “Program Edison” in the pop up dialogue box. Listen for the “modem” sound of the file transferring. The lights should go back to flashing when it is programmed. Unhook and press “play”. It is easy to get started. It is already built, though you can build complex devices using blocks. It moves, or turns things you attach to the wheels. It has some sensors. It has two lights. It plays music. It can be programmed multiple ways. They have good support documents and sample codes. It will automatically turn off after 5 minutes of unuse. At $50 it is the same price as a Sphero mini….so which is “better”? Always depends on what you are trying to accomplish, but I think this offers more with the sensors and ability to build different things out of it (an ice cream truck, a crane, a printer, monster with waving arms…) as well as program in 3 different platforms. It is browser based, so it needs Internet connection. I ordered mine on Amazon, though if you go through their website you can get bulk discounts. One similar program in the three coding platforms : (Python is definitely a learning curve ; definitely need the help documents for syntax)  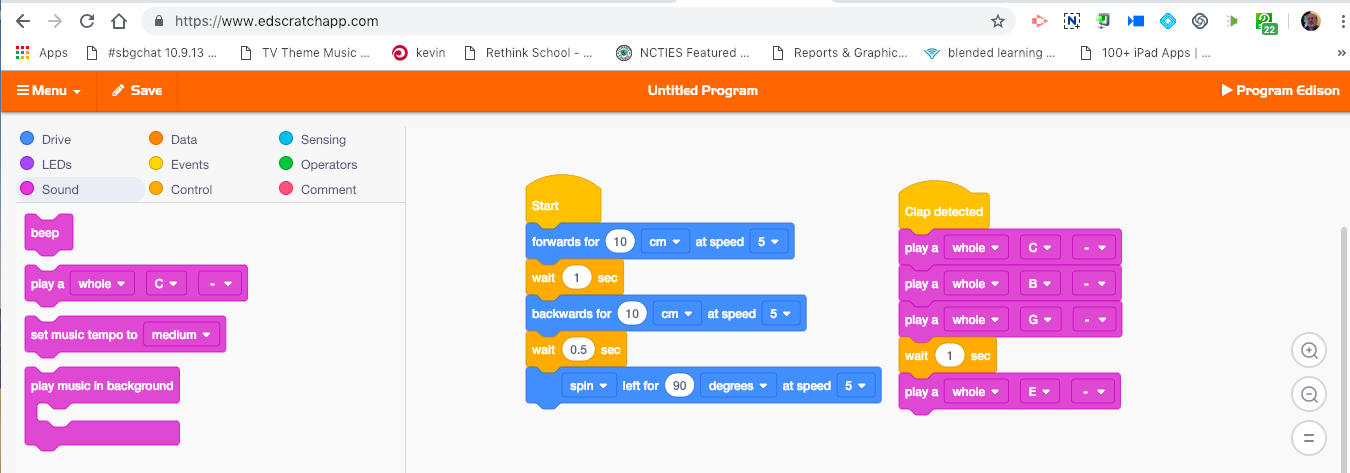 
0 Comments
I picked up a Hummingbird Bit Base Kit to do some comparisons of microbit based coding/robotics (CRICKIT & MakerBit) (how they use servos, motors, inputs, sensors, LED or Neopixel and ease of programming) I will tell you a little about the Hummingbird kit here. This kit includes : Microbit, Hummingbird controller, 2 RGB LED’s, 3 1 color LED’s, rotary sensor, light sensor, 2 FS90 servos (can control up to 4) & 2 extension cables, USB cord, 4- AA battery pack with barrel connector. ($117 including a microbit ; $99 without microbit) . I added the bluetooth dongle ($12) for more options in coding with a computer (snap, python, java). I also added the sound sensor ($6) {other choice would be a distance sensor ($10) 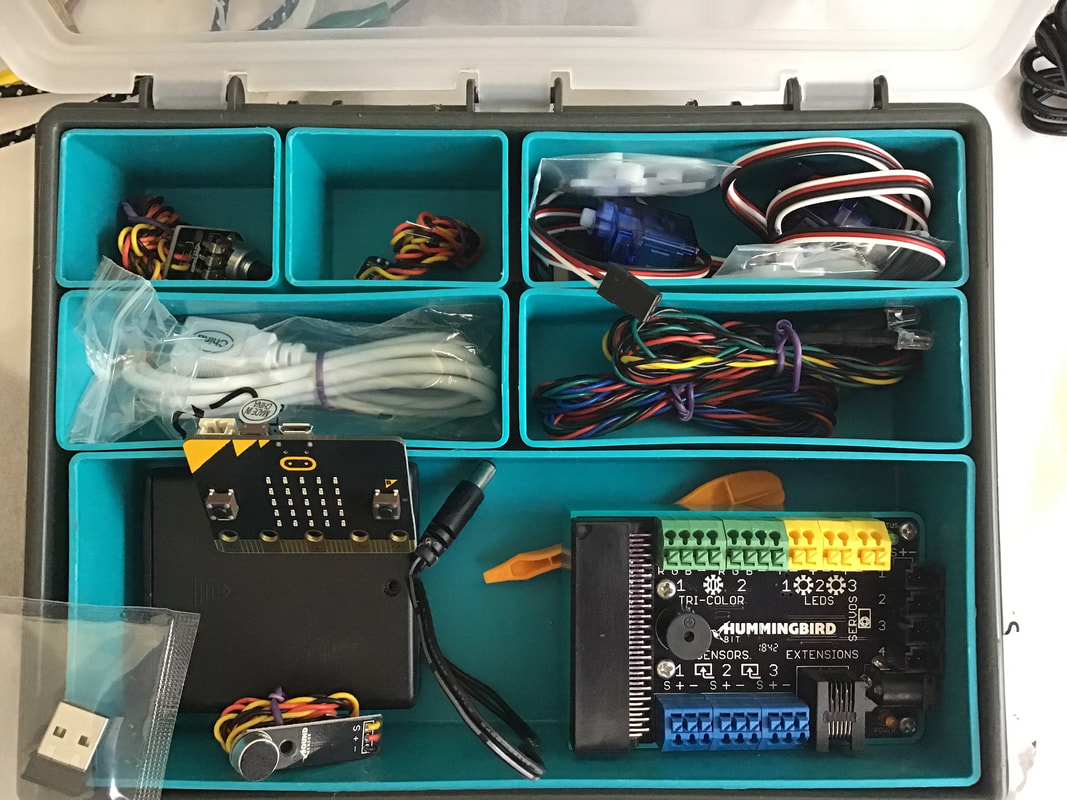 The Hummingbird controller has ports for : 2 RGB LED’s 3 individual LED’s 4 servo’s 3 sensors Go ahead and add 2 more servo’s to your order. They are not any cheaper on Amazon. I would get the FS5103R ($11 ) 360o continuous rotation (it is also larger, 36 g, and more powerful). If you like the micro size (mass 9 grams) get the FS90R on amazon (birdbrain doesn’t sell this one). There are many options for servo brand, and a couple of options for size. They can also get pricey. I have also seen a couple of different size namings, but they also classify by the “grams” of the servo. One site called the 9 gram FS90 a micro, one called it sub micro. Remember that you are only using 6 volts, so pay attention to that spec on different servos (some require higher voltage). The “R” seems to signify continuous rotation. There are lots of Programming options : You need to start here ---> https://www.birdbraintechnologies.com/portal/ A) Computer (mac or windows) MakeCode makecode.microbit.com (obviously) Snap https://snap.berkeley.edu/ (& bluetooth dongle) Python (download editor) (& bluetooth dongle) Java (download editor) (& bluetooth dongle) B) iPad (& I assume Android) Birdblox app C) Chromebook MakeCode makecode.microbit.com Snap https://snap.berkeley.edu/ & bluetooth dongle) D) Linux (RasPi) MakeCode makecode.microbit.com Snap https://snap.berkeley.edu/ & bluetooth dongle) Python (usually included in RasPi distributions) (& bluetooth dongle) Java (& bluetooth dongle) The Hummingbird extension of makecode adds some blocks, most important is “Start Hummingbird”. I am wondering what happens if I go back & forth between environments. In particular , I started with the iOS app. Now if I go to makecode on my computer then back to iPad, will I have to re-install the firmware to the microbit to talk to the hummingbird (as in did it get overwritten by makecode files. Birdbrain technologies has a great many resources for people getting started. Here is a downloadable/printable pdf of coding cards on “getting started” ie: plugging things in and coding individual components (LED, servo, sensor). http://www.birdbraintechnologies.com/downloads/Coding-Cards-01.10.19.pdf I will say it all comes in a nice package. It is easy to figure out what to plug in where. You don’t have to buy replacement LED’s from them as long as you have some jumper wires to use (though theirs are shrink wrapped to stay connected) The servo’s are NOT proprietary, so any ones you get should work (3 wire). The sensors seem to be proprietary, though with jumper wires I believe you could connect your own. But are there code blocks for different ones with different ranges. Not sure (yet) how we would make a button/switch and code it. The 4 AA battery power pack is simple. Though I wonder if they could they make the controller to accept 9 volts? A 9V is half the mass. When you first turn the microbit on (plug it into the controller and add power) it wants to make sure you know how to find button A & B, how to shake and how to tilt. It would not connect to my iPad or iPhone. Which is odd, because I connected easily when I was playing with them at a conference a couple of months ago. Apparently you have to download some firmware to the microbit the first time (back to get started https://www.birdbraintechnologies.com/portal/ ). So plug the microbit in to your computer, download, drag & drop, unplug from computer. It is flashing three letters, those would be the first letters of the three word name for the device. NOW if I click on connect, the device shows up. We can start coding from the iOS device. The iOS app (& Android I assume) is a Scratch/Snap looking set of code blocks. Easy to use. You can play a note via the “buzzer” on the Hummingbird, but you cannot play a sound or a recorded sound, those will only play on your tablet. The “record sound” is a nice feature, if you are going to have your tablet nearby. I do not know the length of the recording. The coding is live, as in you do not have to send it to the device, it updates every change. They have instructions on some basic builds https://www.birdbraintechnologies.com/hummingbirdbit/build/ , teaching resources https://www.birdbraintechnologies.com/hummingbirdbit/teach/ , some general education resources https://www.birdbraintechnologies.com/hummingbirdbit/resources/ as well as nice tutorials on how to program different components https://www.birdbraintechnologies.com/hummingbirdbit/birdblox/program/1-1 Be sure to bookmark these links. Some are printable pdf format. 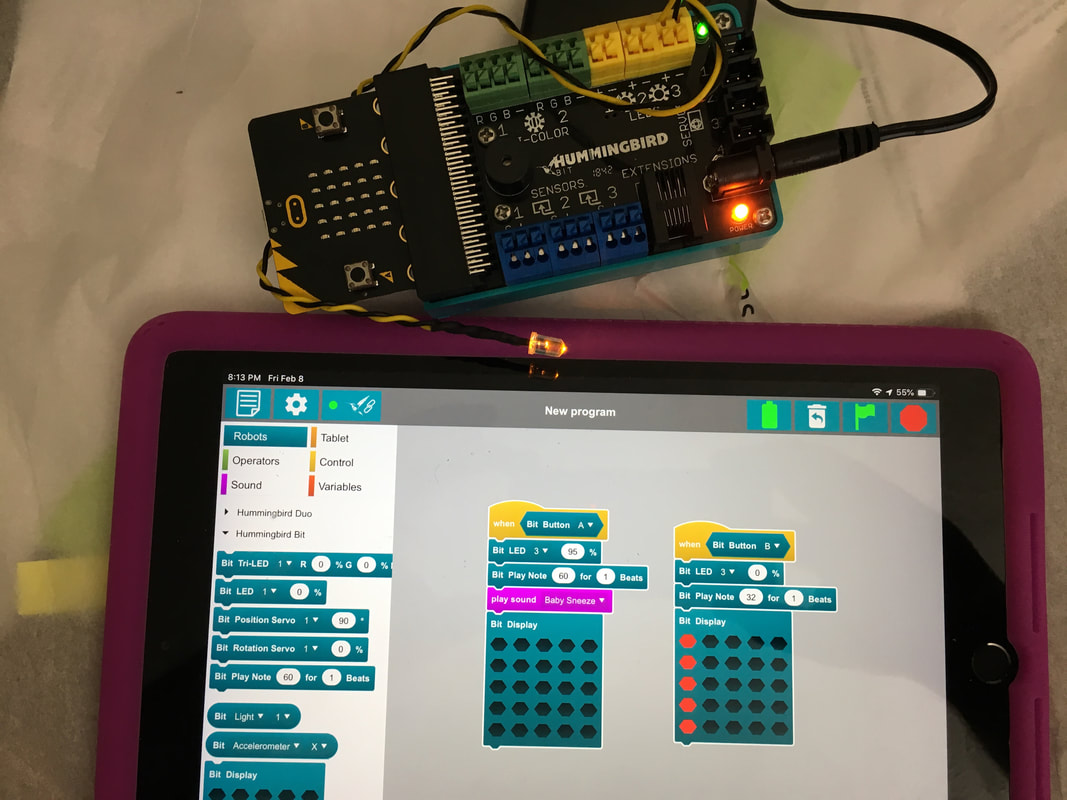 Simple program,,, press a button, play a beep, turn on a light, set array of lights
I have always liked Birdbrain kits. It is easy to connect (color coded & labeled) and simple to program. They have good resources. I like that they have kept up with the multiple options to programming. I do not like that I cannot add neopixels to it (i love neopixels). I have not played with continuous rotation servos yet (it does not come with them ; it should) but I think I will be okay with not being able to use motors (use the continuous rotation servos instead). I never like the price point of robotics stuff. I always think it should be a little lower. 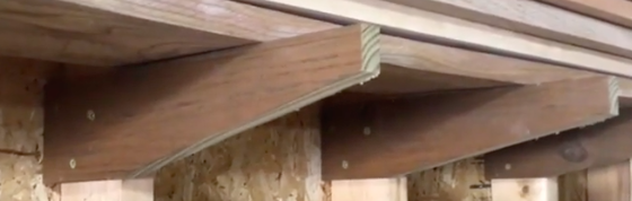
Storage is always an issue in a #MakerSpace, and a garage/shop is no exception. Between tools and materials, there is so much "stuff". I have a tough time throwing away "scrap" wood ; I think I can aways use it for something down the road, even as simple as being a spacer or wedge. I also have some good hardwood waiting for warmer weather and projects (winter is cold in a detached garage). it was 50 degrees (F) and sunny on a February Sunday, which means a good day to work in the garage. I decided to set up some horizontal wood racks. My garage is unfinished, therefore the studs are showing and are easy to attach things to (all 3 walls have an assortment of shelves and hooks).
I created 3 "shelves" for wood. They are made by attaching 14" long supports to 6 studs (18 total supports). Each support was made from scrap wood. They range from 3"- 4" wide and I also cut a 2 degree angle at the base to get a little "lean back" using my mitre saw (some I had to rip, some as is). About 4 inches in from the back end I cut a taper to 1 1/2" at the "sticking out" end. I used the band saw to cut the taper, it didn't have to be anything perfect, so I free handed them, quick and easy. I used a clamp to hold in place, pre-drilled 3 holes and used screws to attach. Instead of measuring down from the top or up from the floor to locate each subsequent support, I used a level. I placed it on the one and marked the next stud where it was level. I decided to put a shelf in the corner above my tires (I have 2 sets of tires, one winter, one all season). This shelf is for my scrap hardwood. It has 2 - 2x4's for left and back support, as well as a support like the wood racks for the right side. The final thing I did was attach a strip of scrap molding on the underside the left 3, bottom rack supports as a place to store my growing collection of clamps (you can never have too many clamps) The video just talks about this... It does not show the steps in progress (sorry). |
Archives
December 2022
Categories |
 RSS Feed