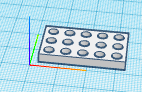
 I have had an idea for several years, but have not acted upon it. Design/create files to laser cut or 3D print plates and bars and bricks for robotics kits (think VEX parts or Lego). Have you already done this??? Please let me know how it went. Laser cutters can make parts faster, but some 3D printing will be needed (think angle brackets). Not having access to a laser has kept it in the back of my mind. It got pushed back to the front when I recently came across Stemfie 3D ( https://twitter.com/Stemfie3D , https://stemfie.org/ ). They have a whole set of part files for you to download and 3D print “STEMFIE is a free educational construction-set toy you can download and make at home using a 3D printer “. Though I still dont have access to a laser to test these out yet... In following the rabbit hole, I found someone had created a Tinkercad CodeBlock to design your own Stemfie beams - https://www.tinkercad.com/codeblocks/hM2Wx2UNpqC-stemfie-tinkercad-beammaker-codeblock . The power of CodeBlocks is many, but variables and loops are at the top. Now the real rabbit hole began. Yes, I want to laser cut things (quicker-easier) so I need to get the SVG — easy, it is just an export from CodeBlocks and that SVG goes into Lightburn or CorelDraw. But this beam design has holes in 3 dimensions, which I need to take out 2….as well as some other tweaks to make. Needless to say, there were dozens of iterations. The latest version takes inputs for the size of a “unit block” (length width height and radius of hole). A “unit block” is the smallest, repeatable part of the building system that we will replicate to make any size shape. Which is why it also has input for length and width of your plate/brick/beam. This design is a building part that can be connected to others through holes (like Vex, whybricks, UBTech) https://www.tinkercad.com/codeblocks/gqrPREmZRIZ-building-blocks-with-holes-version-1-tinkercadcodeblock Make a copy of the file and play with it yourself. I have not tested these yet with a 3D printer or laser cutter… working on that. Let me know if you do. 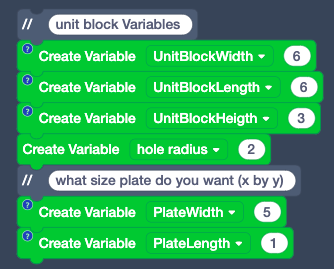 The first step is to get inputs for the variables. Now create a unit block to replicate. An important thing to remember is that CodeBlocks centers at the origin….so half of the shape is below the build plate. The final step is to move it up : 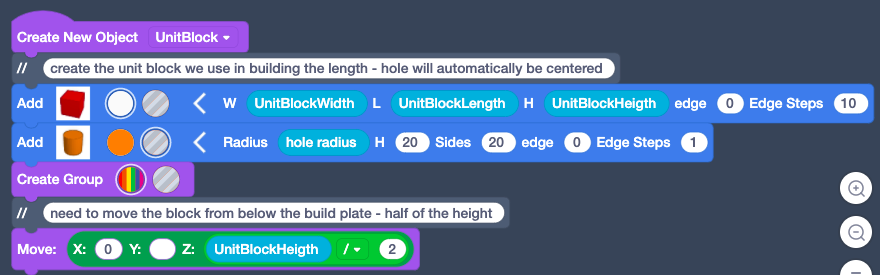 Time to start building our plate/beam/brick in the x direction. Copies copy directly over top of the original object, so we have to move them the x direction so they are adjacent to each other. But each subsequent one has to move further, which is why “math” & variables are so nice. We still have the original block, and we could have left it….but that would have meant our shape was 1 bigger than we asked for / or we would have to ask for 1 less than we wanted in the beginning… just confusing. So we delete it : 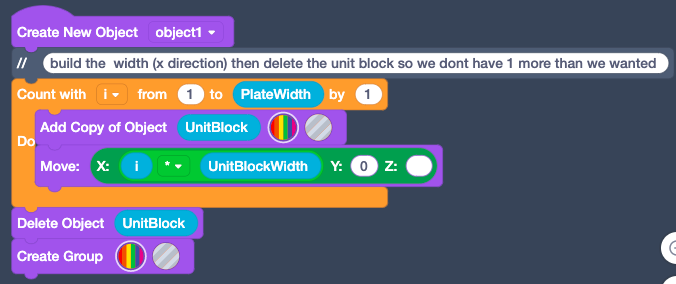 Time to build in the second dimension (in the y direction). Same kind of loop coding, just working the y variable of length. 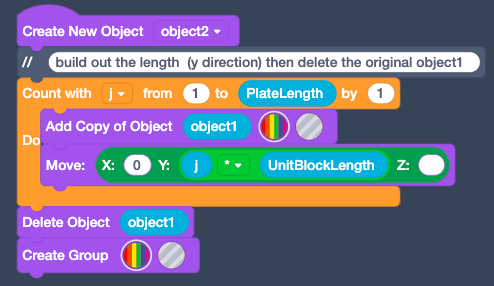 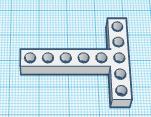 Done. Run the code (hit play). Export your STL for 3D printing or your SVG for laser cutting. Possibly even cooler is to export “Part”, then open that part in Tinkercad 3D design and make various shapes by combining copies. Be careful to “lock part size (prevent scale)” when you export. For example, I can make a T shape part. I exported a 5x1 part and opened it in Tinkercad. I copied it, rotated it 90 degrees, then aligned it center and on the end of the original, then grouped them together. Make any shape you want all from a basic start of a row. 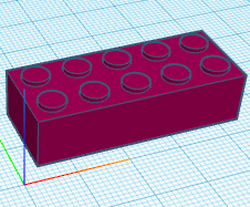 I also created a generic CodeBlock for building block that uses nubs on top, like Lego. There is also a hole underneath that is just a little bigger than the nub. Again, I have not tested this yet. Obviously having nubs, this would not be laser cut. https://www.tinkercad.com/codeblocks/e2JqRHCjkeq-building-block-with-nub-tinkercadcodeblock There are several issues with making your own. One is the tolerance/quality. Will holes, nubs fit? What is the kerf of the laser and where do we need to cut (on the line, inside the line….)? Another is, it seems everyone has their own dimensions. UBTech is 6x6x6 mm with a 4 mm hole, Stemfie is 12.5x12.5x12.5 with a 7 mm hole, Lego is 8x8x9.6 mm with a 4.8x1.6 mm nub. whybricks , are supposed to be compatible to Lego (i dont have any whybricks). Zack Dowell https://twitter.com/noiseprofessor shared a link to a “Free Universal Construction Kit “ (it is a real thing) http://fffff.at/free-universal-construction-kit/ that has STL files for adapters to go between building kit platforms, like merging Tinkertoys with Lego.
0 Comments
Your comment will be posted after it is approved.
Leave a Reply. |
Archives
December 2022
Categories |
 RSS Feed